# 快速入门
# Environment 环境
- Centos 7
- Openresty 1.13.6.2
# 步骤 1: WAF 下载安装
# 安装(已包含 openresty 安装包)
将代码下载到/tmp 目录,运行 install_waf.sh 文件,jxwaf 将安装在/opt/jxwaf 目录,具体如下:
- $ cd /tmp
$ yum install git (若无git的需先运营本行命令安装git)
- $ git clone https://github.com/jx-sec/jxwaf.git
- $ cd jxwaf
- $ sh install_waf.sh
- $ 运行后显示类似信息即安装成功:
nginx: the configuration file /opt/jxwaf/nginx/conf/nginx.conf syntax is ok

nginx: [alert] [lua] waf.lua:566: init(): jxwaf init success,waf node uuid is 99d977e8-401b-4ede-a427-94f7170638ce

nginx: configuration file /opt/jxwaf/nginx/conf/nginx.conf test is successful
- 访问 https://www.jxwaf.com 并注册账号,在全局配置页面获取"api key"和"api password"
访问 https://www.jxwaf.com, 点击 “登陆” 按钮
跳转到登陆页面后,点击 “注册” 按钮

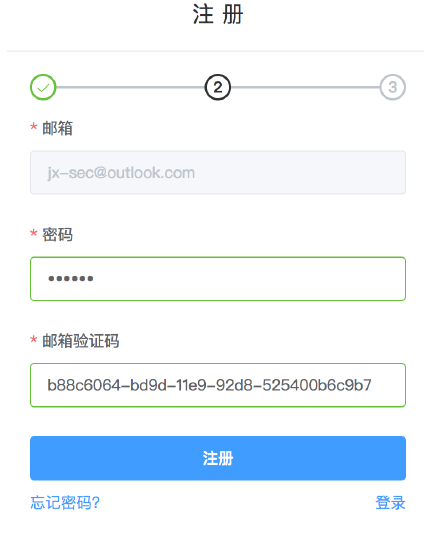
输入邮箱和图片验证码,请注意查看邮件是否被放入垃圾邮箱,正常情况您将接收到如下类似邮件

输入密码和邮箱验证码即可注册成功
登陆控制台后,点击 “全局配置” 栏目,即可获取账号的 “api key” 和 “api password”
- $ cd tools
- $ python jxwaf_init.py --api_key=a2dde899-96a7-40s2-88ba-31f1f75f1552 --api_password=653cbbde-1cac-11ea-978f-2e728ce88125
- api_key 为全局配置页面中"api key"的值,api_password 为"api password"的值,运行完成后,显示类似信息即安装成功
config file:  /opt/jxwaf/nginx/conf/jxwaf/jxwaf_config.json
config result:
init success,access_id is a20be899-96a6-40b2-88ba-32f111111111,access_secret is a42ca0ca-80b5-8e4b-f250-3dc309cccccc
auth result:
try to connect jxwaf server auth api_key and api_password,result is True
$ /opt/jxwaf/nginx/sbin/nginx
启动 openrestyopenresty 会在启动或者 reload 的时候自动到 jxwaf 管理中心拉取用户配置的最新规则,之后会定期同步配置,周期可在全局配置页面设置。
注意:JXWAF 是通过控制台或者 tools 目录下的脚本进行配置,除非您是专业人士,否则请勿擅自修改相关的配置文件
# 步骤 2: 添加网站
进入控制台后,点击 “网站配置” 进入网站配置页面,点击 “添加网站” 新增要防护的网站。
如果你的网站是HTTP的,请看下图 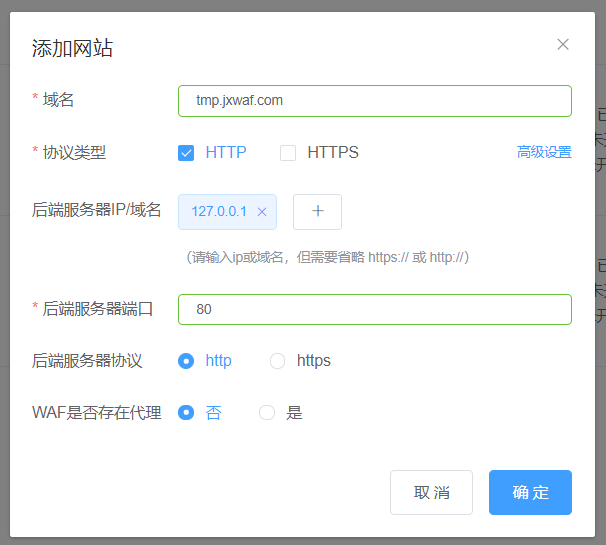
如果你的网站是HTTPS的,请看下图

了解配置详情,请看 配置指南->域名配置
创建域名后,可以在“网站配置” 页面看到域名的状态

默认情况下,新建域名仅开启 Web 应用安全防护,可通过“防护配置”页面进行修改。
# 步骤 3: 防护效果验证
网站配置->日志配置->本地日志记录
点击按钮开启本地日志记录
开启本地日志记录功能后,可通过命令 "tail -F /opt/jxwaf/nginx/logs/error.log"实时查看防护情况
假设配置域名为 "tmp.jxwaf.com",则可通过以下命令触发 SQL 注入防护
curl "tmp.jxwaf.com/?a= 1' and union select * from ss"
2019/08/14 11:21:18 [error] 25247#0: *44956 [lua] log.lua:153: {"host":"tmp.jxwaf.com","upstream_connect_time":"-","deny_arg":"query","logstore":"0fbcea1f-04fafc2f-7454-42fe-876f-b5bf39fff1f0","xxf_addr":"192.144.135.9","status":"403","request_start_time":"2019-08-14 11:21:18","upstream_addr":"-","headers":{"host":"tmp.jxwaf.com","accept":"*\/*","user-agent":"curl\/7.29.0"},"log_type":"protection_log","protection_type":"jxcheck_protection","upstream_bytes_received":"-","request_time":"0.000","upstream_status":"-","upstream_bytes_sent":"-","method":"GET","upstream_response_time":"-","bytes_sent":"336","protection_info":"attack_request","owasp_type":"sql","uuid":"022d7fb3-04e9-4022-a062-920bd71ddb54","uri":"\/","query_string":"a= 1' and union select * from ss","remote_addr":"192.144.135.9","scheme":"http","body":"","version":"1.1"} while logging request, client: 192.144.135.9, server: localhost, request: "GET /?a= 1' and union select * from ss HTTP/1.1", host: "tmp.jxwaf.com"